Showing posts with label costume. Show all posts

Sunday, January 19, 2014

Princess Serenity!

Forgive my long absence from the world of blogging, it's been far too long I know!
 
I have done a few blog-worthy creations in my absence, and I hope to get the chance to share them with you!
 
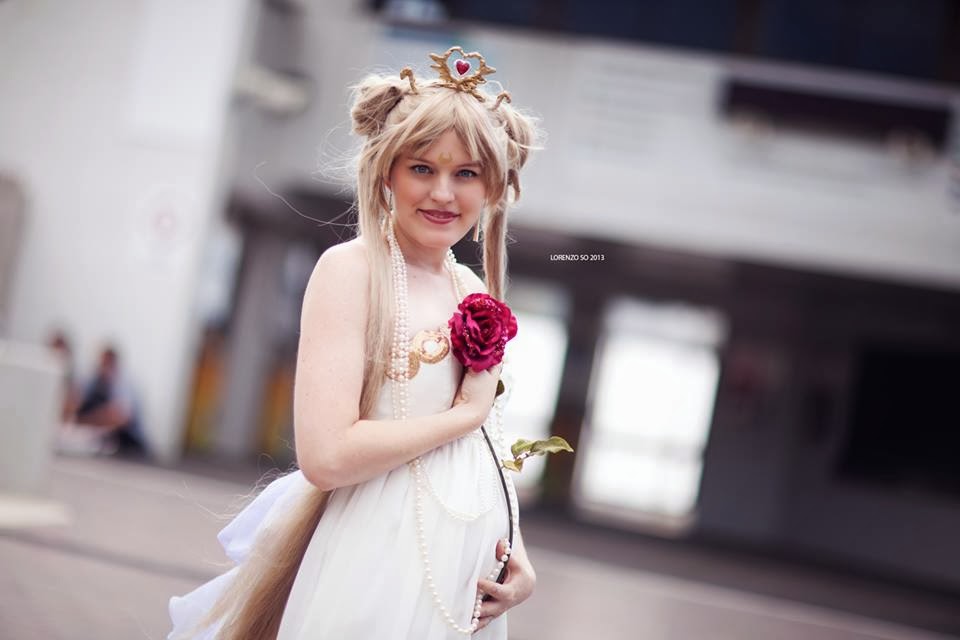
Here is a costume I made for Supanova Brisbane in November last year. It was one I promised myself that I would one day make, when a certain condition was met. Can you guess what that was?? I'm going to give you the chance to think about it, but I will tell you at the end of my post...


My favourite photos are by Lorenzo So Photography
  
I would love to put a shout-out to the lovely ladies of the following two blogs who gave me great inspiration when creating my dress Vanessa Brannan and My Cute Bow.
 
Some construction notes:
  • I used the tutorial from My Cute Bow to make my bow
  • The gold circles were an amazingly lucky find from Lincraft whilst in Brisbane. They had such a great collection of trims, and I managed to find these lovely glittery circles. The issues I had though was they only had just over a metre of it in stock and it was a combination of large and small circles, with an embroidered gold centre. I ummed and aahhhed over whether there would be enough gold circles to decorate the bodice, or if I should go for the silver that they had. Ultimately, I chose the gold (duh). I separated the gold circles with a few careful snips removed the interior embroidery, and then carefully hand-sewed them to the bodice. The beaded empire waist is also all individually hand-sewn beads.
  • Fabric was from memory a shimmery purple organza for the bow, a white georgette romance polyester (I may have just attributed that wrongly!) and a white satin that was on special. I love the drape of the dress fabrics, but I wish I had chosen a less stiff fabric for the bow.
  • The pattern used for the dress was Simplicity 2398. Modifications were to add about an inch to the bodice and about a foot to the bottom of the dress.
  • I made the tiara out of wire, hot-glue, gold spray-paint, a heart charm I'd purchased in Bali and it attaches to the wig via four bobby-pins that are hot glued on. It was made in a bit of a rush, but at least it is somewhat recognisable haha (someone identified my cosplay based on it!)
  • Earrings and necklaces were purchased from Lovisa.
 
Some in-progress photos:


Hmmm... I could have sworn I'd taken more but I think that is all the progress shots! I made a toile (muslin) for the bodice first to get the fit right. I just hoped that the rest would drape nicely over my blossoming shape... And it did haha!
 
Oh yes, that brings me to the reason for doing this cosplay! Have you guessed? It's because I'm pregnant! Yay!!! I was only 4 months pregnant at the time of these photos, so my bump isn't too prominent. But the dress still fit when I wore it to my Christmas work function at 5 months!
 
My little boy is due to arrive in the world on April 20 (Easter Sunday) and he will be my first little one. I am looking forward to the challenge of parent-hood, but full of feelings of uncertainty and trepidation at the same time. I do hope he shares his mummy's love of dressing up! hehe :D This is how I announced it to the world of Facebook:


If you have any questions about the dress, feel free to ask away and I will do my best to answer!
 

Monday, January 28, 2013

Preparing Dany's Qarth Dress Fabric

As the title of the post pretty much sums up, here is a post to break down the elements of what was done to my fabric before my dress was put together...

Lightening the Fabric:

I have posted about it before here, but again here is a quick recap of what I did to the fabric that I purchased from The Oxford Street Cloth Shop: I put the 6 meters of fabric into my front loader washing machine with two packages of RIT Dye Remover at 60°C. As the fabric was silk chiffon with metallic thread (and expensive at that!) I did not want to ruin the fabric. At the same time, I knew I had to take the plunge and do what had to be done, and find out the consequences later!

You may recall I have previously stated that the fabric I used was the same as the one used in the show. The caveat was that the fabric for the show was lightened, hence my research of the above on how to lighten this particular type of fabric. The good news is that if you use different fabric, the above steps to lighten would not be necessary!


Painting the Fabric:

Funnily enough, I was sure I'd taken more photos whilst I was printing my fabric. I was probably paranoid about getting paint on my camera.
I'm fairly certain that the pictures speak pretty loudly themselves about how things went down. But to break it down for you....


I decided to cut my fabric first, and then print the gold on it. My dress is constructed from four pieces of fabric.


I used sea-sponges to print on the gold paint. I alternated between these two pictured, to give variety in the printing. Each sponge is approximately the size of my hand. I made sure to have a fabric covering to protect the table beneath. Thanks to my bestie Corinna for letting me do this in her backyard!

Apparently the fabric paint I used will set permanently once it is ironed in a particular way, but I decided to not do this (guilty as charged!) because 1: I was running low on time and 2: I wasn't sure how well I would go with expensive silk chiffon and my iron! The paint and sea sponges were both purchased from a local arts supply store, Jackson's.


Pleating the Fabric:

In the show, the fabric of the dress has very structured pleating. I decided that due to time restraints and not having done anything similar before to not include pleating in my design.
I do pleat the fabric where it meets the shoulder pieces, but I did not worry that it was not a feature that continued to the hem of the finished dress.
From washing the fabric in my machine, it left a wrinkled effect on the fabric. I actually thought that it would work just fine this way, and therefore did not pleat the fabric; that is the end result you see in my dress.


If you have any questions about the above, please don't hesitate to ask and I'd be happy to help where I can. Things might get a little hectic at home, as we are moving from our unit to a house! Just a little bit exciting :D It's felt a bit like a drawn-out process, but it will be worth it in the end. I'm excited to have more room for my girl-cave! :D But I hope to see you soon!


Tuesday, January 22, 2013

Daenerys Costume Reference Pictures

Welcome back to my series on how I have created my Daenerys' Qarth gown.

As a part of my costume-creating process, reference images are essential. I love to pour over screen captures and other costumers interpretations of the outfit I wish to create.

I save images like mad, and regretfully I don't always remember where I've sourced my pictures from. I'm sharing the pictures that I think best illustrate the construction of her dress. Whilst I cannot cite every website I gained them from (I'm sorry! :() I do know that a lot of them are from Adoring Emilia Clarke. So here we have in no particular order:


Note how the shoulder pieces are attached! In my costume I have pleated the top of the fabric, sewn a seam, and folded the raw edge under. From here I hand stitched the fabric to the shoulder pieces. 


Here you can see the back of the cape ends in a vee shape. Dany's hair hides this feature mostly on her dress. I achieved this effect but cutting down the middle of my fabric and creating a rolled hem to the raw edges. I then ensured to sew this into a sharp point with my machine.


Another back of the dress shot. Luckily Daenerys wasn't embarrassed about other women wearing the same dress!


Here you can see how the cape is attached into the dress, and not flowing completely free.


Let's take a closer look! Here the cape attaches into the dress approximately 2 inches below the belt. Mine is sewn into the skirt seams with a French seam.


How very helpful of her handmaiden to hold up the dress for us! Sorry, not sure where I got this image from but it is compiled from screen-captures in the show.


And finally, here you can see how the gown has a bit of a train on it. I am fairly certain though that the dress in this photoshoot is different from the one she wears in the show. It seems to pool more around her feet in the show, whereas here it is floor-length with a train. I created the dress how I preferred to wear it (ie not wanting to trip!)


And so there you have it, some pictures and a bit of information that I can provide about my thought process surrounding them. I hope this has been able to help! Additionally, I hope to put up some more posts soon for the creation of the dress elements. Thank goodness for a long weekend this week hehe :D

Thanks for reading!


Friday, January 4, 2013

Halloween Deco and Dressing


Playing with makeup and a
wig before the big day
Probably one of the last things you think a blogger would post about is Halloween in the month of January. But I thought it would be fun to share with you these pictures regardless!

I am Australian, and without fail you will hear people dismiss Halloween as being American and having no reason to be celebrated in Australia. I of course disagree, but I won't get into that debate here! Luckily most people would agree that it's all in fun and even my workplace had a lot of fun getting involved. So the pictures I am about to share with you are from my place of work, but I am being careful not to show pictures of others where you can see their face ;)


Right, it's down to business!

Time for mid morning toy cuddles ;)
Hard at work ...

... Or is it hardly working???

I made the witch... I hope she does not look lame? haha

Just another work day, yes?
Cookie Monster's Evil Brother :)


The Skeleton danced to "Moves Like Jagger" and the cat crooned to "Black Magic Woman" 

From another team... But I loved it!


My shoes with the cute skull hair clips and jack-o-lantern brooch 

My dress is one I commonly wear to work, but I dug out and wore underneath the pettiskirt I made back in '09 as seen in its early days here and here. I threw on two of my skinny belts and had fun with my pencil eyeliner on my eyebrows, and Lime Crime liquid liner for my eyes and cheek and Lime Crime black lipstick.  I decided against wearing a wig and went with my own hair (my Mr also agreed to that!) Corporate meets Halloween! haha ;)

It was great to see so many in the Halloween spirit and I got a thrill to see our office everyday <3 :=":" ahh...="ahh..." memories="memories" p="p">
I really love how my candlesticks turned out! The single candle is made from a dollar store skeleton ornament and a brass goblet-esque container I found in my parents shed months earlier. The candle is an amazing one from Dusk that looks like it is bleeding as it melts.


Workstation in its glory!

I think that's enough pictures, isn't it? I really should share my Christmas workstation photos... But that would more likely be oh say Easter with my success rate? hehe I will leave you with this last one of me making magic... 

Hocus Pocus!


Monday, December 31, 2012

Completed Daenerys Qarth Dress

Just a quick post with some photo updates from my Daenerys Dress which I finished about 5 minutes before the taxi arrived to take my friend and I to the airport. Wouldn't be so bad I suppose if I hadn't been throwing things into my bag right up til the time we left! Funnily enough as I carried the belt in my carry on, a random passenger at the airport thought it was a Wonder Woman belt haha

Anyway, that's the boring stuff. How about some pictures then? Here are some randoms from Facebook and the last one my friend's camera. All pictures were taken at Brisbane Supanova Pop Culture Convention 2012.


Happy that I found my Drogo haha


As I've had a few enquiries as to where I purchased the fabric from, it is a blue/silver silk chiffon shot with metallic thread, and it comes from the Berwick Street Cloth Shop in London. I contacted them after reading another blogger's account of where she found the fabric.

They were very helpful as I ordered the fabric after a couple of emails and a phone call. They no longer had the colour in stock when she enquired, so she purchased a plain colour and dyed it herself. I was lucky in that they had the same colour, but as the fabric was lightened for Daenery's dress, I had to lighten this fabric myself. The fabric itself was 25 pounds a meter, and I purchased 6 meters. Along with postage costs to Australia and the currency conversion, the fabric cost me $280AUD.

To lighten the fabric, I put all 6 meters without cutting it into my front loader washing machine. The machine was set to 60 degrees Celsius and I put in two packets of RIT Dye remover.

It went from this:
To this:


And finally to this (after sponging on gold paint with sea sponges):


I was quite worried at how see-through the end garment would be, however thankfully the test photographs helped put my mind at ease. I was wearing pasties and flesh toned shorts (similar to Spanx I think) and nothing could be seen (that I know of!! -_-;;;).

I am happy to put up a more detailed explanation of how the dress was put together, if enough people are interested? Leave a comment if you would like to see one!


Sunday, April 24, 2011

Happy Easter to All! (More Pink too)

So far it's day 3 of the 5-day long weekend. Happy Easter to everybody, and Happy ANZAC day for tomorrow!

Yesterday, I celebrated two young children's birthday's with Hyper the Clown. Before heading out the door, I asked my other half to kindly take some photos. I do feel sorry for him but he gets used to it hehe


The wig is from my Cure Blossom cosplay, the top is a custom made one based on a blouse that was given as a gift from Serbia (what you can't see so well is the double-breasted pink buttons look that I love!), and I made the skirt and belt myself. What I love about doing what I do with balloons is that it's a fantastic excuse to dress up and not receiving strange looks ;)

I will be putting up a post about the party at my other blog, A Rainbow of Balloons if you want to learn more!

PS.. Do you recognize the butterfly clips from my tutorial? Hehe... They've been adorning my living room curtain, yay!


Related Posts Plugin for WordPress, Blogger...