Saturday, May 18, 2013

Balloon Dress (aka an Audition for Australia's Got Talent)

So, remember that I make balloons? And dresses? I also make balloon dresses! Recently, I auditioned for Australia's Got Talent, with a special dress just for the occasion! I had fun, but I don't think I'll be making it onto the show. But I'm okay with that!


I thought I would share some pictures with you from a mini photo-shoot me and my bestie had after the audition. I really think this is my most favourite balloon dress of all that I have made! 


It was a fun afternoon :) Got a few looks and questions (as you do) while we were in action. Yes, it is all made out of balloons. And no, I wasn't worried about the dress being popped or otherwise deflating!

If you want to see more of my balloons, you can be a fan on Facebook, visit my website or balloon blog! :)


Friday, May 17, 2013

Larkspur Summer Dress

UPDATED 18/05/13 to include pictures of me wearing the dress!


So I decided to enter the Project Sewn 'Sundress Challenge'.


In true deadline style, finished my dress with less than an hour to go!  I submitted my link to the link party 10 minutes before it closed to new submissions. Lucky.


Here in Australia it is nearly 7:30 at night, and my husband is out so unfortunately I don't have any pictures of me wearing the dress. Yet. But I plan on making him er, asking him nicely to take some proper pictures this weekend, outside and all... In the sun. As the purveyors of the challenge would be very glad to hear I'm sure!


Let's break down elements of how this dress came to be.

Inspirations

 THE FABRIC! Ever since I saw the Alexander Henry 'Larkspur' fabric online (probably someone's blog) it was love at first sight.
No project was ever worthy enough to cut into my beautiful fabric. Until now! 

KITTEN D'AMOUR An Australian clothing boutique that sells beautiful creations. Luckily for my purse,there are no stores in Darwin. 


These two dresses (although gorgeous!) were not my inspiration pieces per se, but it is to give you an idea about how lovely and inspiring their dresses are! You can even buy them here or here :)

Design

I had the unfortunate oversight of not ordering more of this yummy fabric. The advantage to this however was adding the solid teal boarder to lengthen the dress, otherwise it would be the most awkwardly short dress I have ever made!

The pattern was from one I have drafted on my dressmakers dummy, one I was creating for another dress entirely (with a fitted skirt no less :P) So this design was more organic and I let it come to me. The pictures below are developing the pattern for the other dress, but here you can see some of the design! Pattern pieces are made from draping on the dummy. And yes, I recycle sheets of paper by sticking them together!

The long sash connects into the side seams, and can be worn either to the front or back with a bow.


Construction

I'll take some photos soon to add of the insides of the dress etc I took great pains to match the fabric picture as best I could, and I'm really thrilled with how the birds of the bodice match up (there is three panels in the front, and 4 in the back).

Finishing techniques have been utilised to give it as much of a professional touch as possible. I hope to share those in these alleged photos :) Done!


Small touches really make the difference! A hand made loop for the hook and eye closure is something my instructor in my fashion design Cert IV really liked... So this is something I always try to consider when making my garments.

I even pulled out my overlocker... A machine of mine that doesn't get as much use as it should!

I'm so happy with my little dress. I am glad I was able to use this challenge as the opportunity to cut into my precious Larkspur fabric. If you have any questions at all, feel free to ask. Oh and I would really appreciate your vote if you believe I am worthy! Click here to see the other dresses and hopefully vote for me! ;)


Monday, April 15, 2013

What is Making Me Happy... And Inspired!

Do you ever get that itch? The one that you can't quite figure out how to scratch? It's that one you get when bitten by the creative bug. Pesky little scamps they are! ;) The only know cure is to get out there and make stuff!

Here's what is inspiring me to scratch that itch but the deadly enemy procrastination is out in full force attempting to neutralise me :S

... Finish my Sailor Moon Costume!


It might look pretty finished, but those bows are pinned on :P I will be wearing this to Supanova Sydney in June so it will be finished by then. 

This fabric! Look at its pretty-ness! Look at it! A guilty pleasure of mine is watching Adventure Time. Don't the little mermaids remind you of the cartoon style? 

 
(img via http://www.comicvine.com/)

Last time I was in Spotlight I saw this fabric but I couldn't afford it at the time. This time round the fabric was on sale for $9.99/m... Sold! I couldn't help myself but buy the strawberry fabric too :3
Except I couldn't find it and it was when I was asking in desperation if it was one of the bolts that needed to go back out on display that a fellow customer pointed out she saw it on the shelves. So I hurried back for my 6th look and finally found it! Wooo! Luckily the other customer knew what fabric I was talking about because the shop assistant didn't! :P

A work friend recently encouraged me to try my hand again at jewellery making, after I was showing her pictures of my crown. She gave me a few of her magazine doubles to help out the inspiration process... And I fell in love with this:

Sorry for a photo lacking visual pizzaz :P

No, not the pin board (which is really awesome BTW) , the rainbow bangle in the corner! It also gave me an excuse to finally put something on my pin board to inspire me. It was looking a little lonely and pathetic with nothing on it. 
As the bangle is all is Swarovski, it's going to be a little pricey and I have to source the bits from the US as I couldn't see them locally. But this is a definite on my list to create! There was also a cute pair of earrings in the same issue, so on the board they went.


I encourage you to visit the seller's Etsy store, Bluebirdss. It is full of rainbow deliciousness,  I can almost not stand it! It is so so hard to pick a favourite :(

For now I should go as my two nephews are coming over for dinner... they are (almost) 5 and 2. I need time to hide the breakables! haha Well, let's hope I have some more progress to show for next time :)


Sunday, April 7, 2013

Balloons! (It's been a While)

Just a quick post to say hi to all! How has your week been? Mine...? Pretty reasonable! Too procrastinat-y for my liking though.

Maybe some of you know I'm a balloon twister, I post about it every now and then. I do have a whole another blog about that too, A Rainbow of Balloons (and I'm on Facebook too - Facebook.com/aballoonrainbow). I actually did a birthday party on Saturday for the cutest little girl, Toula.

I love getting to dress up as my alter-ego Rainbow!


Her awesome Aunt who asked me to come along also had a special request for a balloon Sophia the First... Here was my attempt! I've never made her before, but the hardest part was trying to make her crown! :((


It was absolutely adorable how Toula hugged her balloon! Melt my heart why don't ya kid?! The balloon was almost as big as she was! (I think she'd just turned 2.) I also made her a Minnie Mouse balloon at her party (no photos).

Because I really love my girly balloons so much, I thought I would share with you some of my recent favourite balloons I have created!


Are any of my readers balloon twisters? If you are, I'd love to know! There is so much joy to be had in bring a smile about from balloons!

I'm going to try for my 3rd year of auditioning for Australia's Got Talent. It's coming up soon, so I'm trying to think what I should do this time for my audition piece... :/

In other news, recently I scored some awesome fabric and other purchases which I'd love to share with you in my next post! I've discovered something fun that I'm keen to begin exploring more!

Until next time ;)

Monday, April 1, 2013

How to be a flower Queen...

Recently it was my birthday, and I knew I wanted to have a Murder Mystery party! Gee-wiz was it a lot of fun! Next year though I think it would be my birthday wish to have someone else host it for me ;)

The week before, I started planning my costume. I knew that I wanted to hit a second-hand store or two, so I made this first on my agenda. I was quite pleased when I found a purple dress for a whopping $1, and had a few ideas on how to jazz it up. But it was when I went to the second store that I found this:

I knew I could count on 'The S Shop' (codeword my sister and I use for the Salvos!)
 The sales lady told me all items with a blue tag were half off. Did this dress have a blue tag? Yes it did! And it fit! (Well, okay around the waist it did but I was not voluptuous enough for the top... O well!) I was pretty pleased with spending a modest $5 I must say... 

Next up came the shoes. I sussed out the sales rack at Betts, and picked up this silver pair for $20. Then about $30 worth of fake flowers were purchased from Spotlight. I hit up the sales shelves at Lovisa and Big W for some silver and rhinestone bling-bling jewellery as befitting a Queen....


My last stop before heading home was to visit my old place of work. Here I scored sooo much copper! I really thought it was too much, but bless Virgil, he just kept giving me more! haha


So what did I do with it all? I did this....


Despite a few burns from my hot glue-gun, I had fun making these! I was highly inspired by Sherri Baldy and her amazing fantasy crowns as I created my crown fit for a queen.

 I was going to buy a crown, but I honestly didn't find any that really made my heart a-flutter. I think there could be a market for this. For young and old Princesses alike :) I actually am entertaining the idea of making some crowns to sell, what do you think?  

So how did everything look when it was put all together?? Here are just a couple of pictures from the night:


Like I said before, it was a great night! Once all the planning of this was out of the way, I was free to create my dress tutorial for Daenery's Qarth gown. So I know it was worth the delay! haha

Oh, and if you're planning a Murder Mystery of your own, I purchased a digital download for my party from dinnerandamurder.com (The Immortal Murders!). They are a lot of fun for all involved!


Monday, March 25, 2013

How To Make A Daenerys Qarth Gown

This post has been a long time coming! I will make you wait no more :) For the purposes of showing you how I made this costume, I made a second dress in the dark blue fabric. (The original dress was made in the same fabric as used by Michelle Clapton in the actual show.)

How to make a Daenerys Qartheen Gown

(but not the filigree parts!)

You will need:

Approximately 6 metres of fabric
Approximately 25cms of 1"in wide elastic
Needle for hand sewing
Sewing Machine
Spool of thread to match

Optional:
Dress form
Roller hem foot** (highly recommended! Practice first if you've never used one before)

See how I painted the golden pattern on the fabric learn and why I did my pleating why I did.
Contact me or leave a comment if you want to know who I commissioned the filigree pieces from.

My dress is made from four rectangles of fabric. The fabric widths that I am going to share with you are what worked for my dress. I am happy to share with you the sizes of the rectangles, however the good news is that it is not necessary for yours to be identical!

My measurements are as follows:


And that is my pattern! Easy as, 1-2-3-4! The dark blue fabric that you see in this tutorial is a polyester chiffon, and as such it was very easy to put the fabric to size. Just a small snip and then tearing and it did not warp the fabric and remained on the grain. 
The silk chiffon fabric I used in my original dress (the same fabric as used in the show) was the devil to cut, and I hope to not have to go through those terrors again!

Once I had the pieces at the sizes I wanted, that is when I printed the fabric with the gold paint and sea sponges.

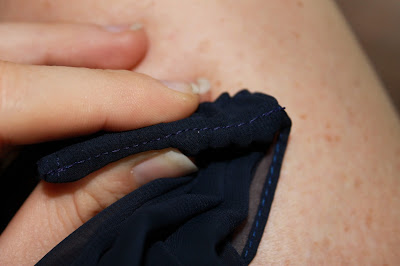
For the sewing the edges of the fabric, I cannot recommend highly enough investing in a rolled hem sewing foot. This gives the fabric a professional edge (think hems of white business shirts or sheets!)

Rolled hem as it is being sewn
I was fully expecting to pay $25+ dollars and was pleasantly surprised when it only cost approx $12 from my local Janome sewing centre (the former price was one I saw on eBay... It does pay to shop local!).

All of my exposed edges of fabric have had the selvedge's trimmed away and then sewn with the rolled hem foot. The side seams of the dress were sewn as french seams.

Onto piecing the dress together...!
The front two panels were sewn together approximately 34cms from the top of the dress. I sewed then a 2cm seam allowance to the hem of the dress. The larger seam allowance allows the rolled hem to be unseen when wearing the dress. I can elaborate on this further if need be, but I hope it makes sense.


Note the centre front seam as discussed above.
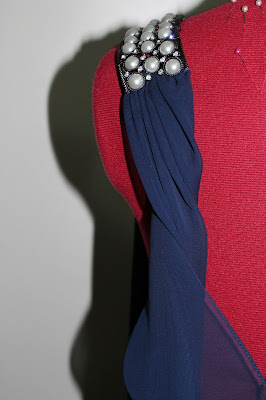
Next I pleated the fabric at the shoulders. I did this first by determining the width of the shoulder pieces and then pinning the pleats in place before securing them with a 1.5cm long stitch.


As you can see from the pictures above, I wasn't overly concerned that the pleats did not all line up at the top edge (I put it down to it being a lot of fabric to pleat and that I don't think it is that big of a deal). For the dark blue dress, I was working with a very narrow strap; but for the faithful reproduction of the dress had a wider width so it was not as difficult to get the pleats to look decent.

Next some hand sewing is in order!

Preparing to hand sew...
As above, the seam allowance was folded once over and then hand sewn to the shoulder pieces.

... and hand sewing all finished!

Now the back of the dress happened a little differently. Because I didn't want too much bulk at the back of the dress for the cape, I used only one width of the fabric, and created a split. What made the decision easy was that I only had 6 meters of fabric to work with. I might have completed this the same as the front way if I'd had an extra two meters!
So you can chose to do it the same way as the front if you wish. And so if you do wish, repeat the above for the back!

If you are like me and had to use the one piece, read on...


First I carefully* (*read: cheated a bit) cut down the centre of the fabric to the depth I wanted and used the roller hem on the raw edges.
Then I pinned the wrong sides of the fabric together and sewed a dart, catching the raw edges from the split. I also trimmed it back a bit. Next I pinned the right sides of the fabric together and sewed a 2nd dart being carefully to fully enclose the first one. This is what it looked like when finished:

This is hopefully how the back of the cape will look when done
Now you can sew the shoulder pieces to the back of the dress. I thought I was being really careful until this happened:

I know. I can't even.
I had to unpick and try again. Luckily this did not happen with the first dress! This is what the dress looks like at this stage from the side:

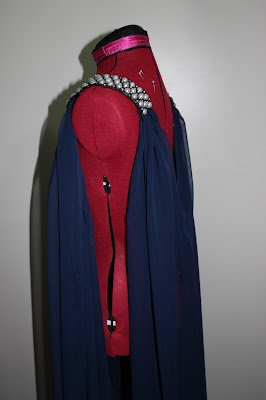
A little revealing if you stopped here!!
Next, a think casing was made in the piece that would become the skirt or back of the dress. In my version of this dress, the back of the skirt is attached to the front of the dress at a height where it will cover your backside - creating the actual dress. The cape is then sewn into the seams of the dress. I will talk again on this shortly...


I chose to use a nice thick elastic for this waistband. A length of elastic was then cut (approx 25cm) and threaded through the casing. I secured it with machine stitches at the sides to ensure it was not going to slip out.

The below picture shows the back of the dress being pinned to the front. in order to line things up to my liking, I first sewed these two seams before going back to sew the cape into the sides of the dress with a second seam atop of the original stitching.


But Sonia, will you please tell me what a French Seam is?
If you are not familiar with a French seam, you might be wondering why the wrong sides of the fabric are being sewn together. It's because a French seam is sewn in two steps. The first is at approximately 1cm, then you trim the raw edges to approx 5mm. You then turn your garment inside out (don't forget to press!), and sew a second seam that captures your raw edge. 
What you need to be very wary of is making sure you do not capture any of the first seam's raw edge in your new seam. Because if you do it will stick out the sides of your dress once you've turned it back the right way and trust me that this will not look very pretty!
With that in mind, you might like to do a 6mm second seam. Give yourself a larger seam allowance if you are concerned with the finer details.
French seams are recommended on fine fabrics that will fray if not finished or to avoid using an overlocker which doesn't always suit your fabric choice.

Back to the dress.
When sewing the cape's seam, I wanted to make sure that it joined into the dress a few cms below the top of the back of the skirt. I hope this illustration from an earlier post can better show you what I mean:

See how it joins in below where the belt actually sits?

From here - eyes on the prize! You're not far off the finish line!

Once the side seams are finished, try on your dress - preferably with your belt, so it cinches in and will sit on your body like the finished garment. From here, determine the length the dress will be. As I used my dress makers dummy set to my height, I didn't need to do this to get the garment length. (But I did try it on and grin like a champion! haha)

From here, make any necessary adjustments to your hem length. I then sewed the hem of the dress with the rolled hem foot. With the cape, I left the ends square (ie: no rounding into a curve or anything) and sewed the edges again with the rolled hem foot. The train drapes out behind the dress approx 35cms. You can opt for this to be shorter, or even the same length as the dress itself if you don't want to worry about it dragging on the ground (I was constantly carrying mine and let it down for photos).

And there you have it; this is how I made my dress! Are there things I would do differently? Yes, I think so. At this stage I have made 3 versions of this dress, so I've changed things up slightly along the way with all the new things I learnt along the way. 

I hope I have been nice and clear for you... But if you have any questions at all... Please do not hesitate to ask and I will do my best to answer for you!

Finally... Some photo spam! ;)


Because I would like to know if this tutorial has helped you at all, I would love it if you leave a comment! Please be kind to this old girl (hey... I just turned 21 29.)


PS... WINTER IS COMING!!! (Woo, 6 more days and counting :D)
Related Posts Plugin for WordPress, Blogger...